So now that we have our Arduino sending MIDI data, it’s time to turn that data into music!
Goal
Have the Arduino send MIDI data to the PC and have the PC recognize the data as MIDI and play it back for us using software that supports MIDI Input and Output (e.g. Reason, Logic, etc).
The Problem
Arduino communicates with the PC over a Serial port, but we want to communicate using MIDI. We need a way to convert the serial output into something the PC understands to be a MIDI port. There are two ways to solve this problem, and both have their pros and cons:
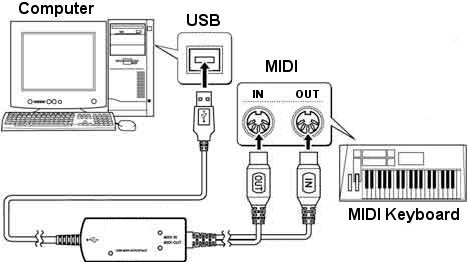
- Create a MIDI port on the Arduino - this allows you to plug the Arduino into the computer with a MIDI-to-USB cable.
- Pros:
- Computers instantly recognize the Arduino as a MIDI device - no virtual MIDI software required (which means less to setup before playing and less latency).
- Cons:
- No wireless option: you’re tethered to the computer.
- Pros:
- Use Serial to MIDI conversion software to send Serial data coming from the Arduino to a virtual MIDI port.
- Pros:
- Works with any incoming serial data from any source (USB, Bluetooth, WiFi, etc.).
- Cons:
- Requires installing two programs and running them every time you want to play.
- Pros:
After weighing both options I decided that having a wireless option was more important to me than easy plug-n-play capabilities, so I went with Option 2. That being said, that’s the option I will be elaborating on in this tutorial. If you prefer Option 1 for your project, you should just be able to follow the Arduino website’s MIDI tutorial to get that option working.
You will need:
- Arduino (Uno, Mega, etc)
- MIDI Accordion’s MIDI Tutorial
Solution #1
If you prefer Option 1 for your project all you should need is to follow the MIDI tutorial on the Arduino website and you should be done - when you plug in the MIDI cable from the arduino’s MIDI connector to the computer the computer should automatically recognize it as a MIDI port and receive MIDI data.
You will also need:
- MIDI-USB cable
- MIDI connector PIN
- 2x220Ω resistors
- Jumper Wires
Going further: Shiftmore demonstrates how to integrate the MIDI<->USB circuit in the cable into the Arduino. In theory, one could build a plug-n-play MIDI device that would work on any computer with any USB cable using this method. I personally haven’t tried because I would prefer to get my accordion communicating MIDI data wirelessly via bluetooth, which would not be able to send data in MIDI format. I’ve looked into wireless MIDI transceivers and they can be pretty expensive.
Solution #2
For solving the Serial to MIDI conversion on the Computer side, we need three pieces of software:
- one to convert the serial output from the Arduino to MIDI,
- a virtual MIDI port to connect the converted output to your MIDI playback software of choice,
- and, of course, your MIDI playback software of choice.
Serial to MIDI conversion software
This program takes in a serial port (in this case, our Arduino output) and connects it to a virtual MIDI port so that the computer recognizes the data as MIDI. Here are a couple options:
I decided to go with Hairless MIDI because it provides an easy way to debug MIDI messages, and the site has good documentation. It’s also compatible with Windows, OSX, and Linux.
Virtual MIDI port software
A virtual MIDI port is used in lieu of a physical USB port to tell the computer that MIDI data from an internal program can be used with MIDI output software. Luckily for OSX and Linux users, this is already built into the operating system and can be used with some configuration (see OSX instructions, Linux (Debian/Ubuntu) instructions). Windows users are not as fortunate, however, and will have to install third party virtual MIDI port software. Here are some options for Windows users:
I decided to go with LoopMIDI because I liked having the communication display telling me when it’s receiving data. It’s also capable of creating multiple MIDI ports, which is not necessary for this project, but it could open the door for future work involving multiple MIDI inputs.
Virtual MIDI Controller/Playback Software
Any virtual MIDI controller will get the job done, so you can pick your favorite. Logic (Mac) and Reason (Mac, Windows) are two popular options, but there are many others. I’ll be using Reason for my final project; it’s overqualified for the job, but it offers a wide variety of high quality sounds with practically limitless configuration ability.
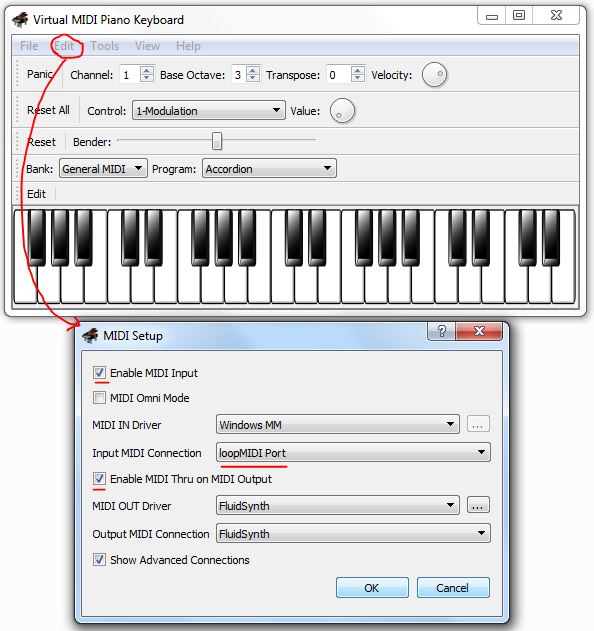
If you don’t have a virtual MIDI controller program and don’t want to shell out the money for a high-end DAW, I recommend using Virtual MIDI Piano Keyboard (VMPK) which is free, compatible with Windows/Mac/Linux, and comes with the FluidSynth MIDI OUT driver which, for Windows users, is vastly superior to Microsoft GS Wavetable Synth in both sound quality and response time.
Steps
Once all of the software is installed, perform the following steps to hook everything up:
- Upload your MIDI code to the Arduino (see the previous tutorial for details).
- Start your virtual MIDI port (if it’s not already started).
- Open your Serial-to-MIDI program:
- Select your Arduino port as the Serial port
- Select the virtual MIDI port you created in Step 2 as MIDI Out
- At this point, if done correctly, you should see MIDI data going through.
- At this point, if done correctly, you should see MIDI data going through.
- On your MIDI controller program, create a MIDI connection to the virtual MIDI port. This step greatly depends on your program; here’s how to do it in Reason and VMPK:
VPMK Configuration
Reason Configuration
And that’s it! If done correctly, any MIDI messages being sent from the Arduino should now be playing back on your computer. Have some fun playing around with the arduino program (changing notes and duration), and try setting different instruments on your MIDI controller - keep in mind that whatever sounds are available to you now will be hooked up to your accordion when you’re done, so start thinking about how you want your accordion to sound.
Up next: How to map user input to MIDI output.
Troubleshooting
“I can’t upload code changes to the Arduino.”
- You can’t update the Arduino code while the COM port is in use by the MIDI<->Serial bridge, so you have to turn it off (including debug messages) when uploading new code to the Arduino.
- If you try uploading quickly after plugging it in, sometimes it fails to find the COM port. More often than not unplugging and replugging the USB cable seems to do the trick.
Credit
Thank you to:
- Angus Gratton for making the Hairless MIDI<->Serial Bridge
- Tobias Erichsen for making loopMIDI
- Pedro Lopez-Cabanillas et. al. for making the Virtual MIDI Piano Keyboard