One of the most unique features of the accordion is the ability to control volume by pushing and pulling the instrument. This tutorial will show how we can use a pressure sensor to add the same functionality to a MIDI accordion.
Goal
Add expressiveness to the MIDI accordion by reading the air pressure differences in the bellows and converting it into MIDI velocity (i.e. volume).
The Problem
Unlike a piano, accordion keys are not pressure-sensitive. The volume of the accordion is dictated by how hard you push or pull on the bellows. We need to find out how we can convert that action into a digital signal. We can use a barometric pressure sensor to do just that.
You will need:
- Arduino (Uno, Mega, etc)
- BMP180 Barometric Pressure Sensor
- Note: Most components I’ve seen require head pins to be soldered on before you can use it, so if you need to and haven’t yet I suggest brushing up on your soldering skills.
- BMP180 Arduino Library
Note: As of writing this page the BMP180 is largely discontinued, but you can still get the Arduino library for it. There are other pressure sensors out there such as the MPL3115A2 and the MS5803-14BA. You are welcome to look into using these components instead, but this guide and the accompanying tutorials will assume you are using the BMP180 hardware and library.
Solution
1. Hooking the BMP to the Arduino
Start by hooking up the BMP180 to the Arduino. You can get details on how to do this and how the sensor works in this SparkFun tutorial.
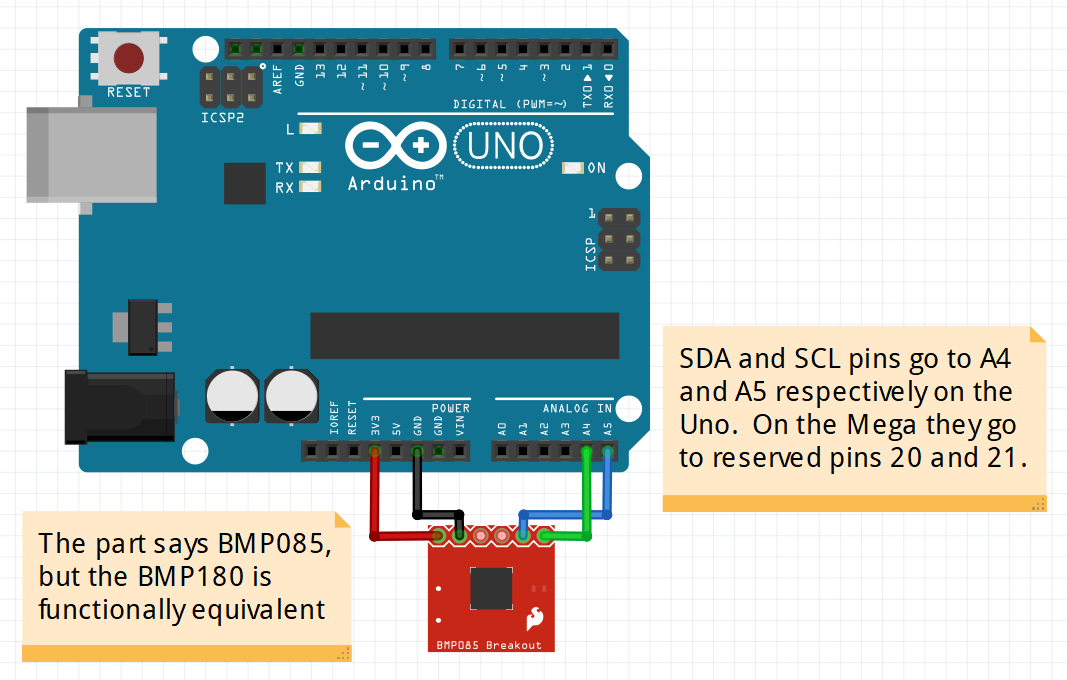
Note that the SDA and SCL pins are different depending on which Arduino board you’re using. This example uses the Uno, which uses A4 and A5, whereas the Mega has dedicated SDA and SCL pins (20 and 21). Also remember to use a voltage divider to send 3.3V instead of 5V.
Once it’s hooked up, you should be ready to test the circuit using this first BMP tutorial, which is a modified version of the Sparkfun Library example that reads and displays changes in pressure every second:
//Get a temperature reading, then use it to retrieve a pressure measurement
double Temp, Pressure;
status = bmp_180.startTemperature();
if (status != 0) //If successful, the number of ms to wait is returned
{
  delay(status);
  status = bmp_180.getTemperature(Temp);//Returns 1 if successful
  if (status != 0)
  {
    //Param can be set from 0 to 3, where 0 is fastest and 3 is most accurate
    status = bmp_180.startPressure(0);
    if (status != 0) //If successful, the number of ms to wait is returned
    {
      delay(status);
      //Retrieve the completed pressure measurement using the given temp
      status = bmp_180.getPressure(Pressure,Temp); //Returns 1 if successful
      if (status != 0)
      {
        Serial.print("Pressure: ");
        Serial.print(Pressure,2);
        Serial.println(" mb");
      }
      else Serial.println("error retrieving pressure measurement");
    }
    else Serial.println("error starting pressure measurement");
  }
  else Serial.println("error retrieving temperature measurement");
}
else Serial.println("error starting temperature measurement");
Some additional notes:
- Sparkfun states that if the temperature is stable, you can do one temperature measurement for a number of pressure measurements. However, once I tried this in the accordion I got wildly unexpected results, so the final code will re-read temperature every time.
- getPressure() returns pressure in millibars, but the final code converts this value to pascals (multiplying it by 100).
2. Converting pressure into velocity
Once you have the Arduino displaying changes in pressure from the BMP, it’s time to try converting the message to MIDI velocity. The second BMP tutorial takes the pressure being read and converts it into a number between 0 and 127, which will be used as the velocity value in the final project. Note that you don’t need to have an accordion to test that these functions work; all you need to do is blow on the BMP and you should see changes in pressure being output as velocity values.
The tutorial has a few different functions to pre-configure:
void loop() {
  //Choose which function you want to test:
  velocity_per_ms(500);          //Displays the current velocity every x ms
  //constant_velocity_change();  //Displays the velocity whenever it changes
}
The first function, velocity_per_ms(), is a bit easier to read and see what the values are in real-time, whereas the second function, constant_velocity_change(), more accurately shows the responsiveness of the sensor. I’ve found both to be helpful.
Both of the above functions have a choice on which velocity mapping algorithm to use:
//Choose which algorithm you want to test:
int midi_velocity = velocity_bv();
//int midi_velocity = velocity_dmitry();
//int midi_velocity = velocity_jason();
The code contains three different functions for mapping pressure deltas to velocity: the one I first tried using in my final project, velocity_bv(), and the ones used by Dmitry and Jason in their respective MIDI accordion projects, velocity_dmitry() and velocity_jason(). See section 4.2 for more details on these different functions.
Try uncommenting different functions to test (and comment out the unused functions), and check out the differences for yourself.
You’ll also see that I moved all the sensor code to a separate BMP_180 class to better separate concerns - this class deals with getting the pressure so that the main class can focus on determining velocity.
3. Sending MIDI Control Changes
Now that we have the BMP reading pressure and the Arduino converting the pressure data to velocity, we need to send that data as proper MIDI Control Changes (“CC”) and update the MIDI output software to read that data. The third BMP tutorial demonstrates how to do this.
I won’t go into great detail on what MIDI CCs are - only that they are used to pass in supplemental data on top of note on/off events to add more layers of control. Examples include adjusting volume, panning, modulation, changing instruments, and other events. You can also create custom CCs to send whatever kind of data you want (more on that later). This page shows a list of MIDI CCs and their common purposes, as well as which are undefined and can be used for other purposes.
For the sake of this tutorial, we’re using CC 11 (Expression) to send changes in volume. Note that this is different from CC 07 (Volume), which sets the overall max volume of the MIDI channel itself. See these links for details.
With the Arduino MIDI library, sending CCs is easy:
int CC_Number = 11;//11 = Expression
int value = 100;   //Expression value, from 0-127
int channel = 1;   //MIDI channel, from 1-16
MIDI.sendControlChange(CC_Number,value,channel);
This will set the volume on the given MIDI channel to the supplied value, and will automatically affect the playback volume even on notes that are currently turned on.
By default, this tutorial uses the pressure mapping function used by the velocity_bv() function from Tutorial 2 - feel free to sub this out with whatever mapping you want in the get_expression_from_pressure() function.
If you dive into the third tutorial’s BMP_180 class, you’ll see it looks completely different from the 2nd tutorial. TL;DR: it’s been optimized for performance. If you check the previous tutorial, the function looked like this:
//#1. start temp reading
//wait...
//#2a. get temp reading
//#2b. start pressure reading
//wait some more...
//#3. get pressure reading
In my testing, we spend about 12ms waiting for this function to return. This may not seem like much, but when playing music 12ms is a HUGE latency cost. To reduce this cost, I updated the algorithm to remove the waiting by performing one of the 3 steps above each time you call the function:
- The first time the function is called it’ll do #1
- The next time it’ll check if it’s ready for #2:
- If not, do nothing and come back later
- Else, do #2
- Once #2 has been done, check if it’s ready for #3:
- If not, do nothing and come back later
- Else, do #3 and reset back to #1.
This way, the time originally spent waiting and doing nothing can now be spent doing more important things like scanning the accordion for more key presses. The downside is you now have to call the function several times to get a single pressure reading, which makes it less intuitive to use and read. In this case the pros far outweigh the cons since we’re following one of the golden rules in programming:
Performance > Readability > Brevity
To test this tutorial code, boot up Hairless MIDI and click the Debug checkbox to see the MIDI CCs being sent.
4. Calibrating the BMP with your accordion
Now that we have the sensor up and running, here comes the tricky part: we need to hook up the BMP to the accordion and calibrate it such that squeezing the bellows feels and makes dynamic changes as realistically as possible. We’ll need to do the following:
- Close as many air holes as possible to get the maximum amount of resistance when moving the bellows while playing.
- Adjust the function used to map BMP pressure output to MIDI velocity so that changes in bellow movement accurately reflect expected changes in dynamics.
At this point you’re going to need your accordion. It doesn’t need to be fully working (though it helps), but you’ll need to at least put the Arduino and BMP inside it wherever you plan on putting it when it’s completed so that pressure readings remain relatively the same.
4.1. Plug the leaks
When playing a real accoustic accordion there is a lot of resistance when squeezing the bellows because air has to go through the reeds to make sound, and the airways to do so are quite small. Our MIDI accordion, however, has no reeds, so the airways are much larger and it doesn’t take a lot of effort to pull and push the bellows. We need to try and mitigate this discrepancy as much as possible, which means closing any airways that aren’t being used.
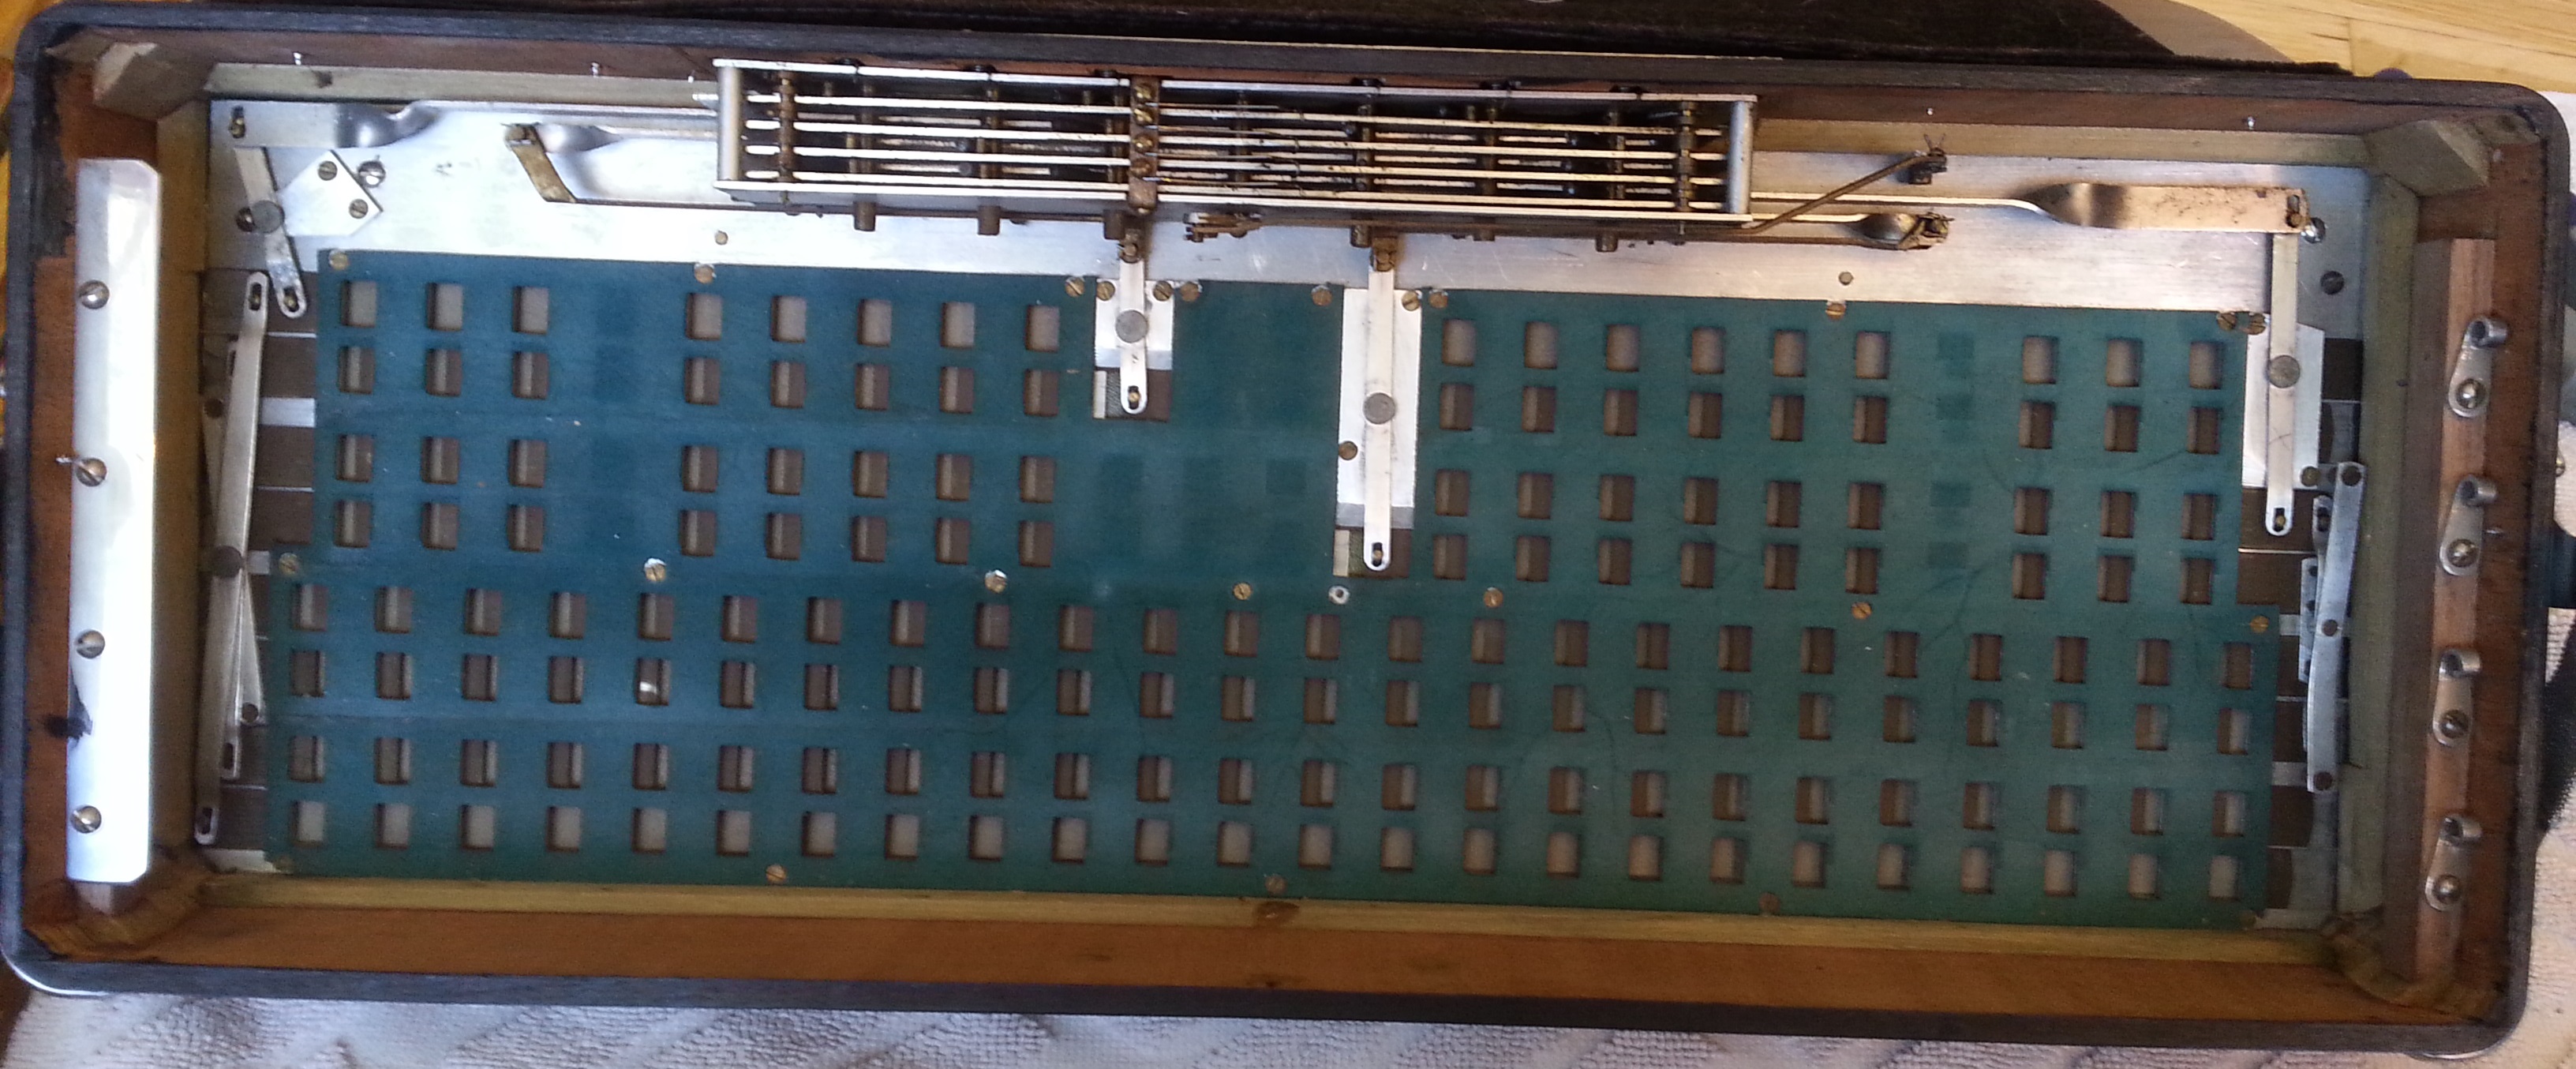
The number of airways that need to be blocked largely depend on the type of accordion you have. Mine is a 4/5 accordion, meaning it has 4 reed blocks on the right hand and 5 blocks on the left, giving those keys 4 and 5 air holes repectively:
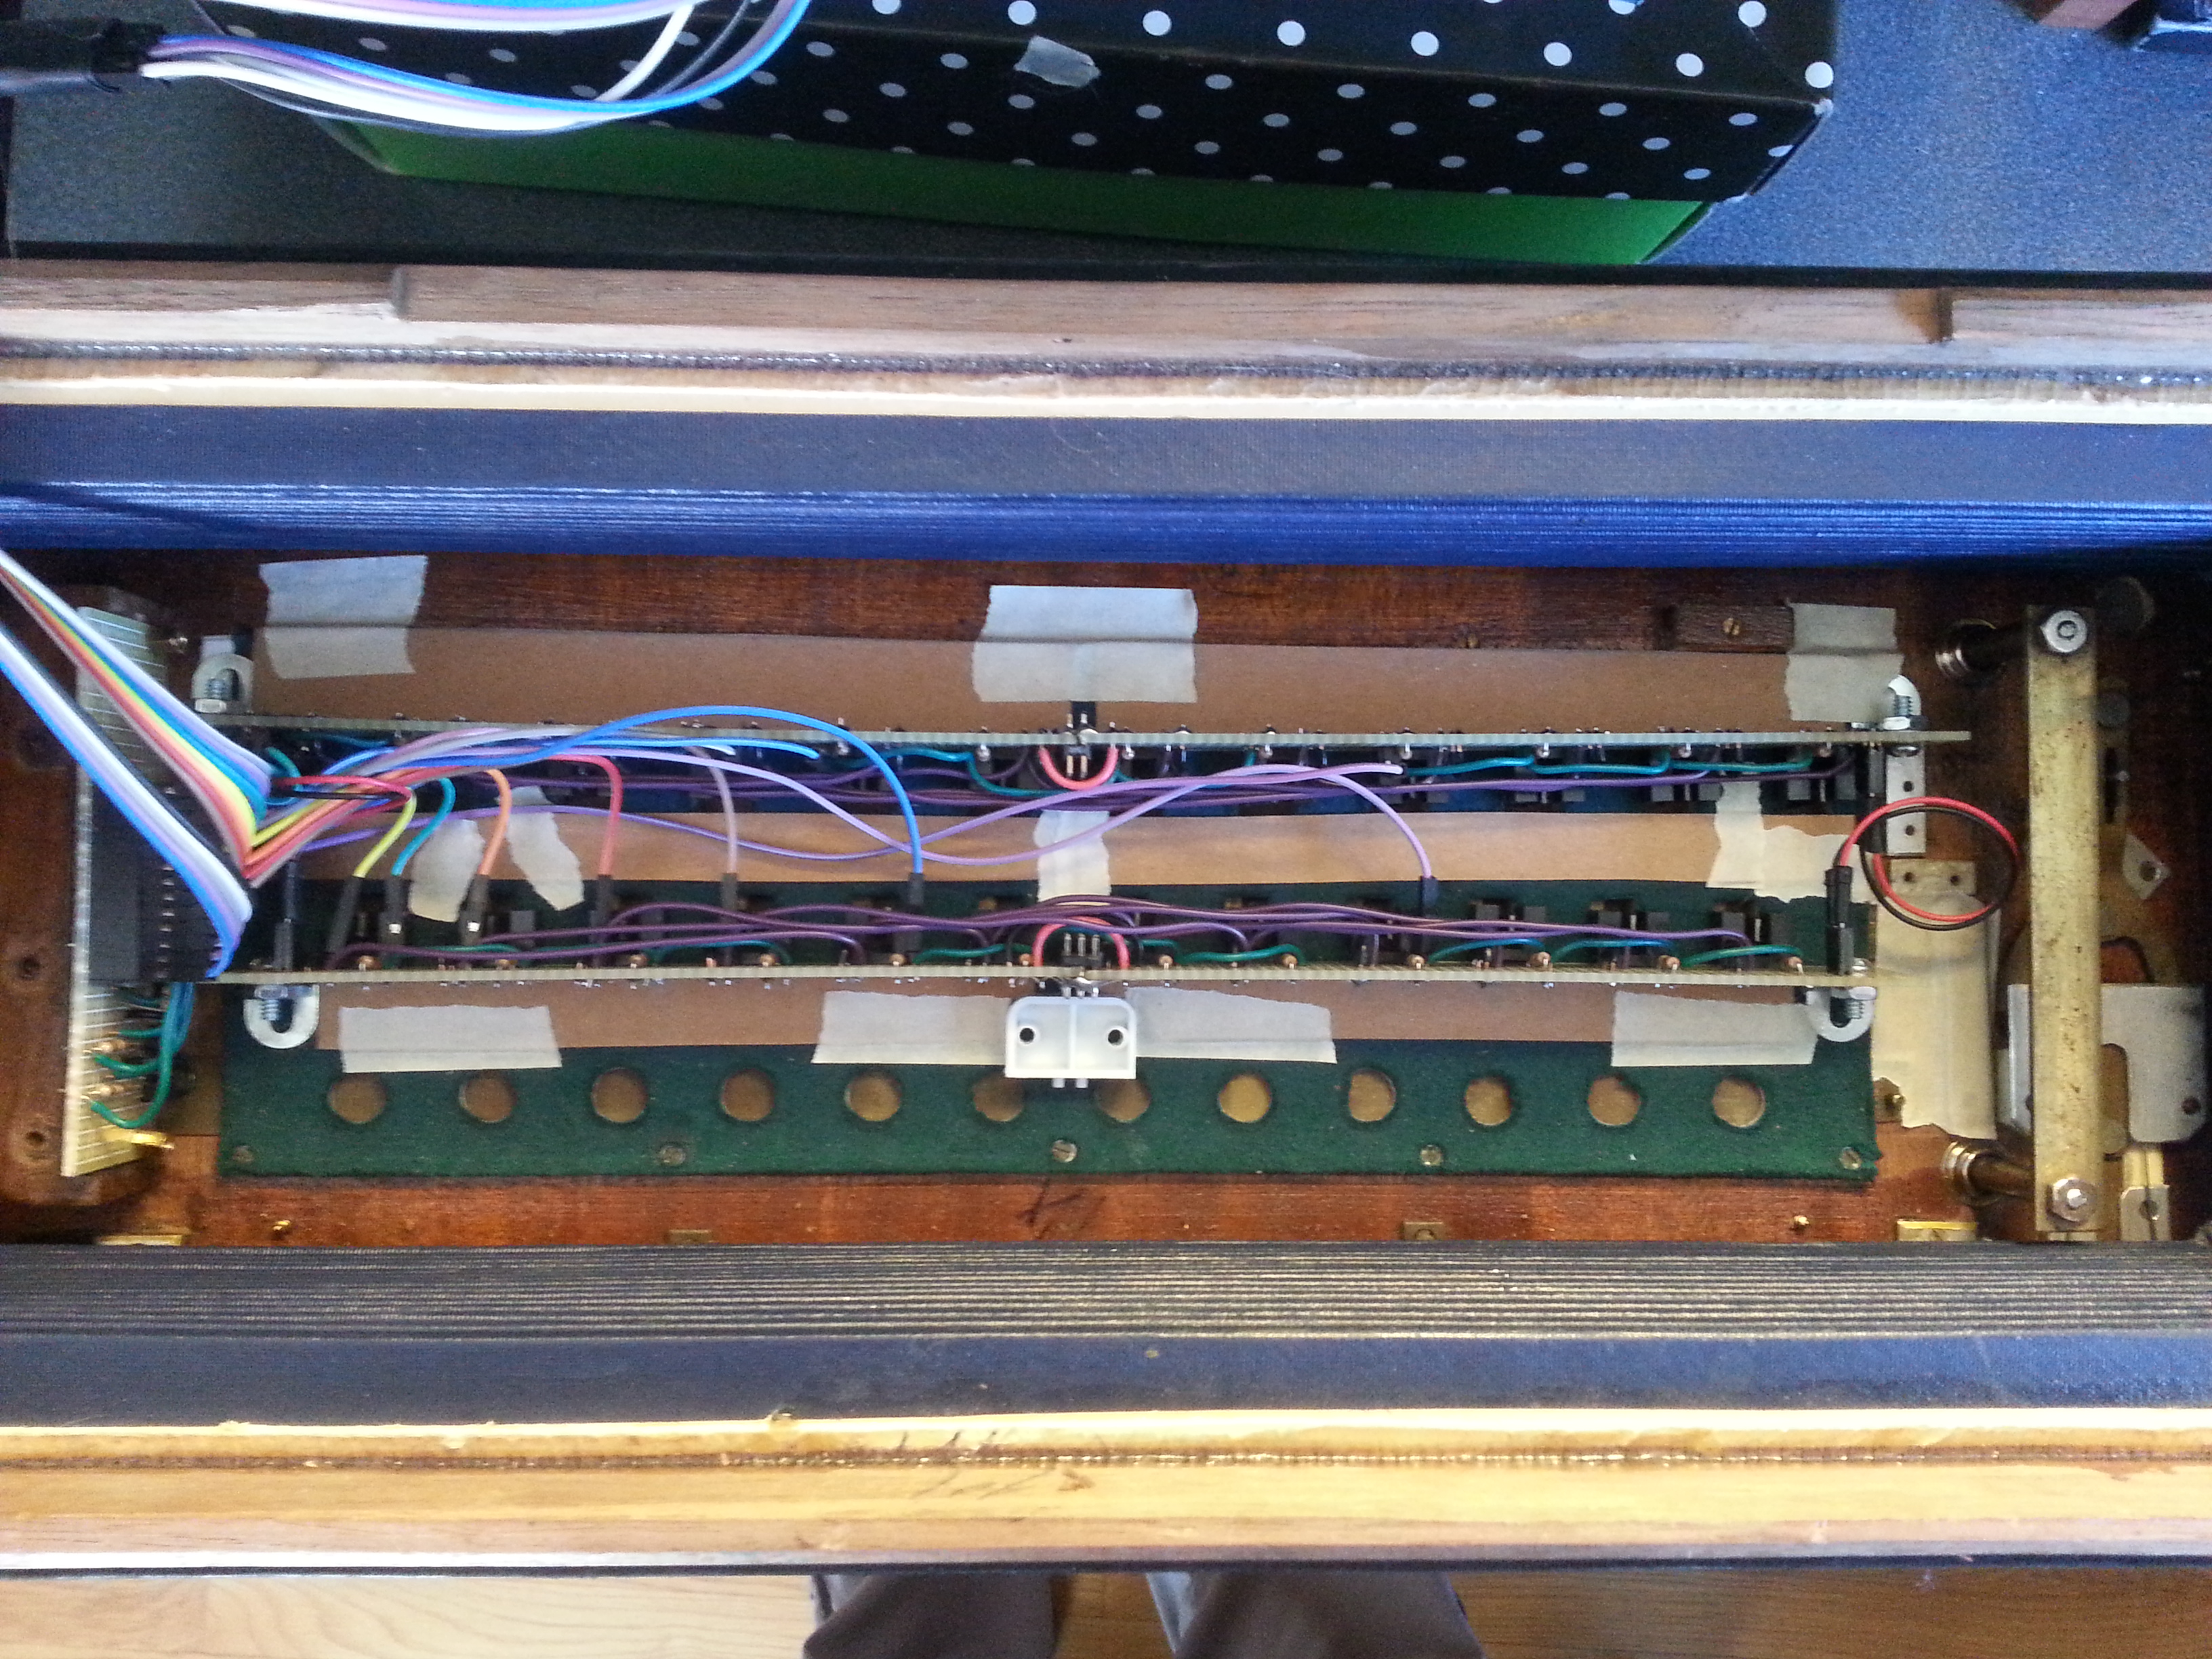
If your MIDI accordion is set up to read the opto-interrupers on the bellows side with blockers on the key pads then at least one air hole needs to remain open per key - the rest can and should be closed. However, If you decided to do what Dmitry and Jason did and put the interruptors on the outside with metal rods blockers, you have the option of closing all air holes and leaving one row open slightly for each key, which will give you a much more realistic feel when moving the bellows while playing. Most of these holes can probably be closed by moving the register switches to the off position, unhooking the plates from the register buttons, and securing them so that they don’t move.
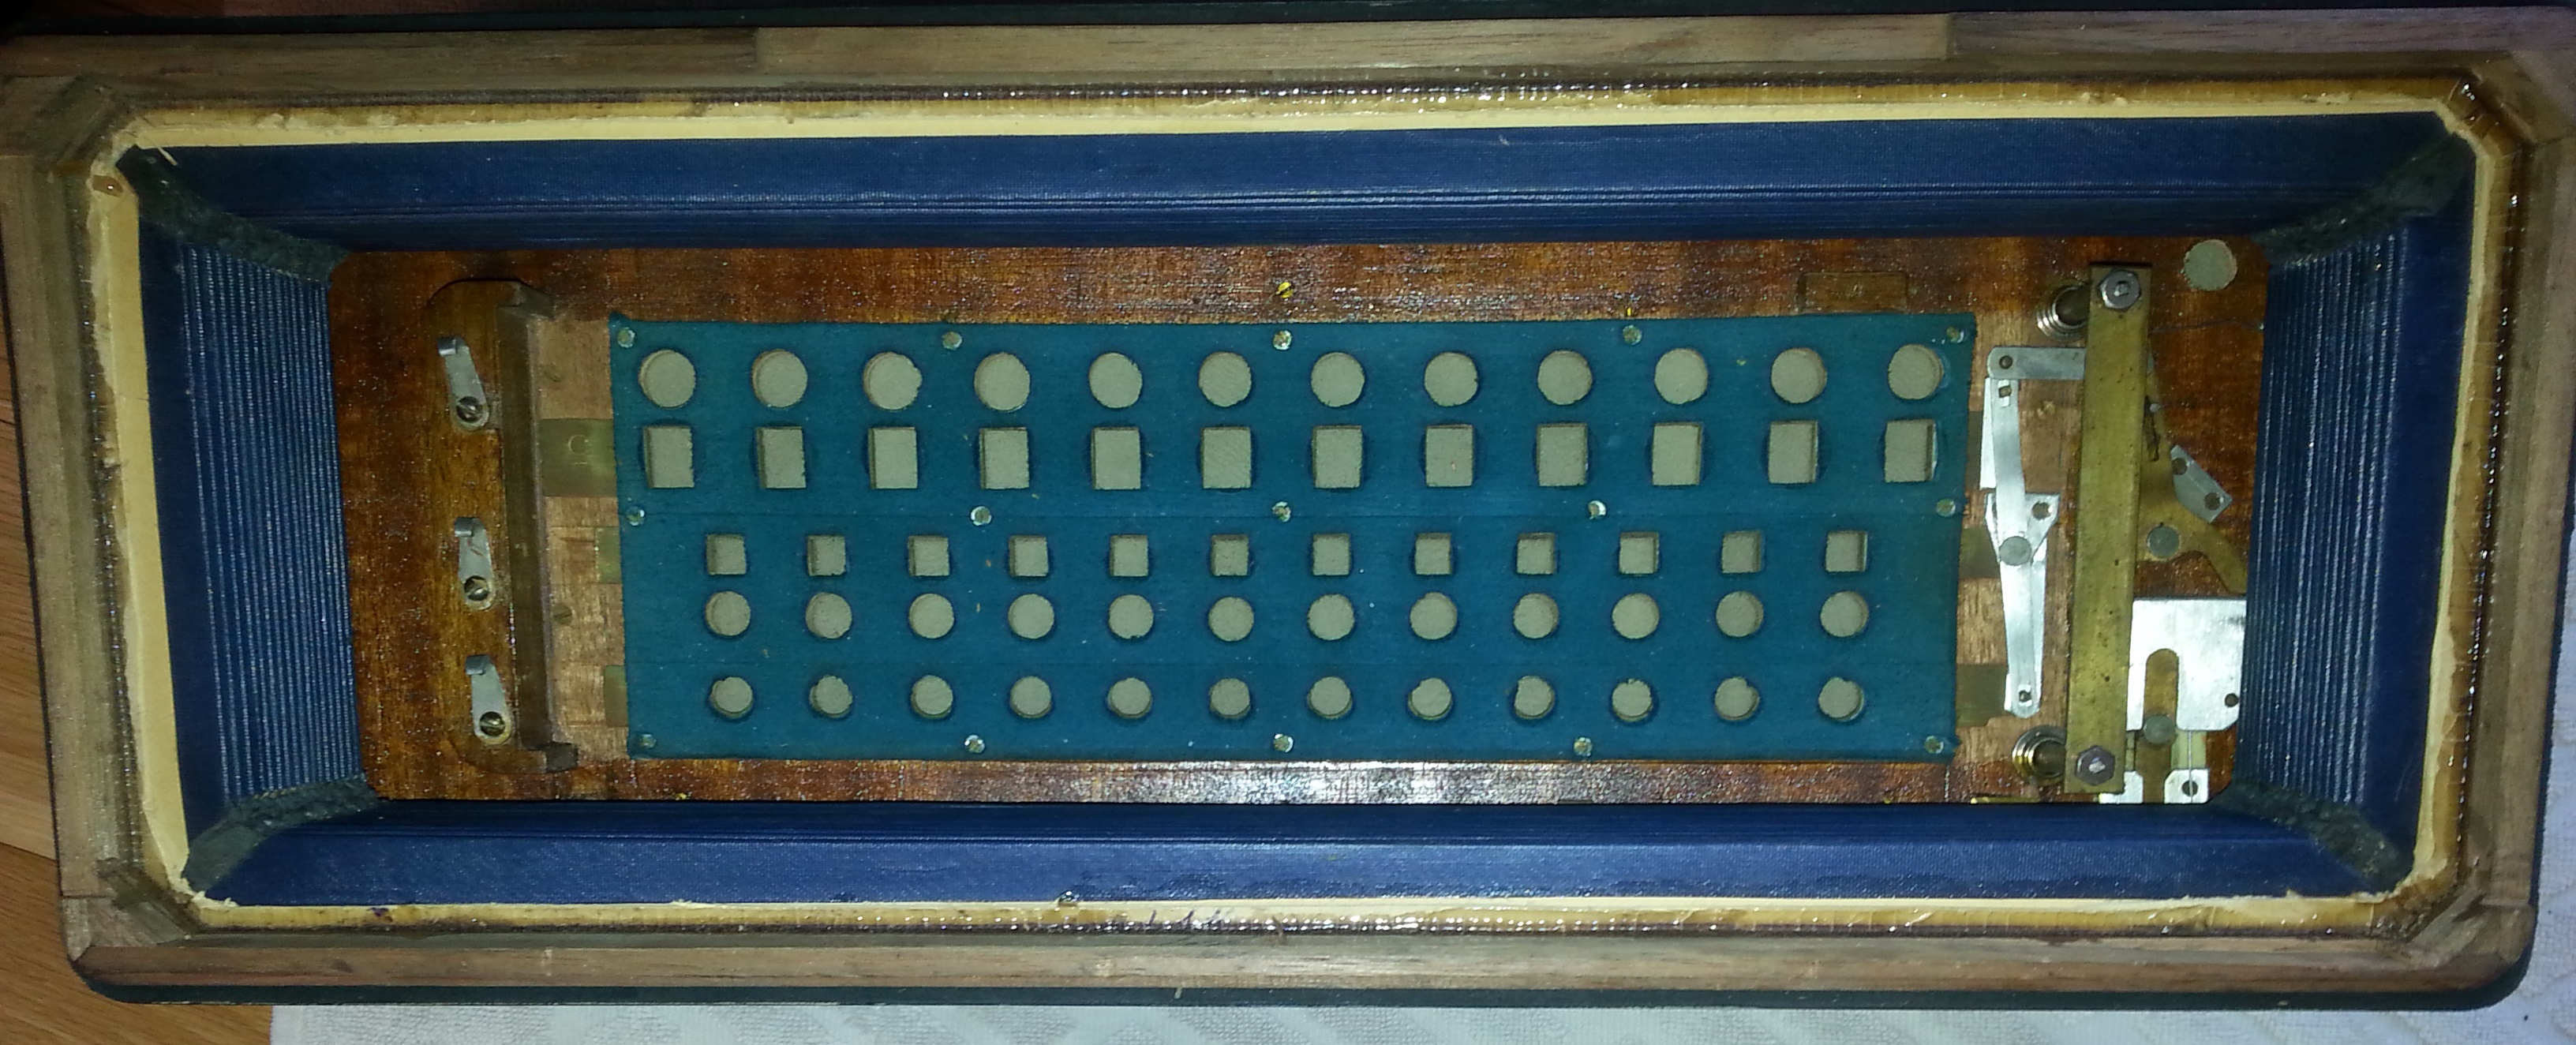
Some key hole rows might not have plates though (particularly the left hand) - in this case cover the holes any way you see fit. For starters, I just taped strips of cardboard, which really only helps ever-so-slightly (I do not recommend this, even as a short-term solution):
Once you’re done closing as many air holes as you can, put the accordion back together and try squeezing the bellows in and out while fingering some tunes - it’ll likely still not feel as tight as a real accoustic accordion, but it should be close enough to get the job done as a first time pass.
4.2 - Adjust the pressure mapping function
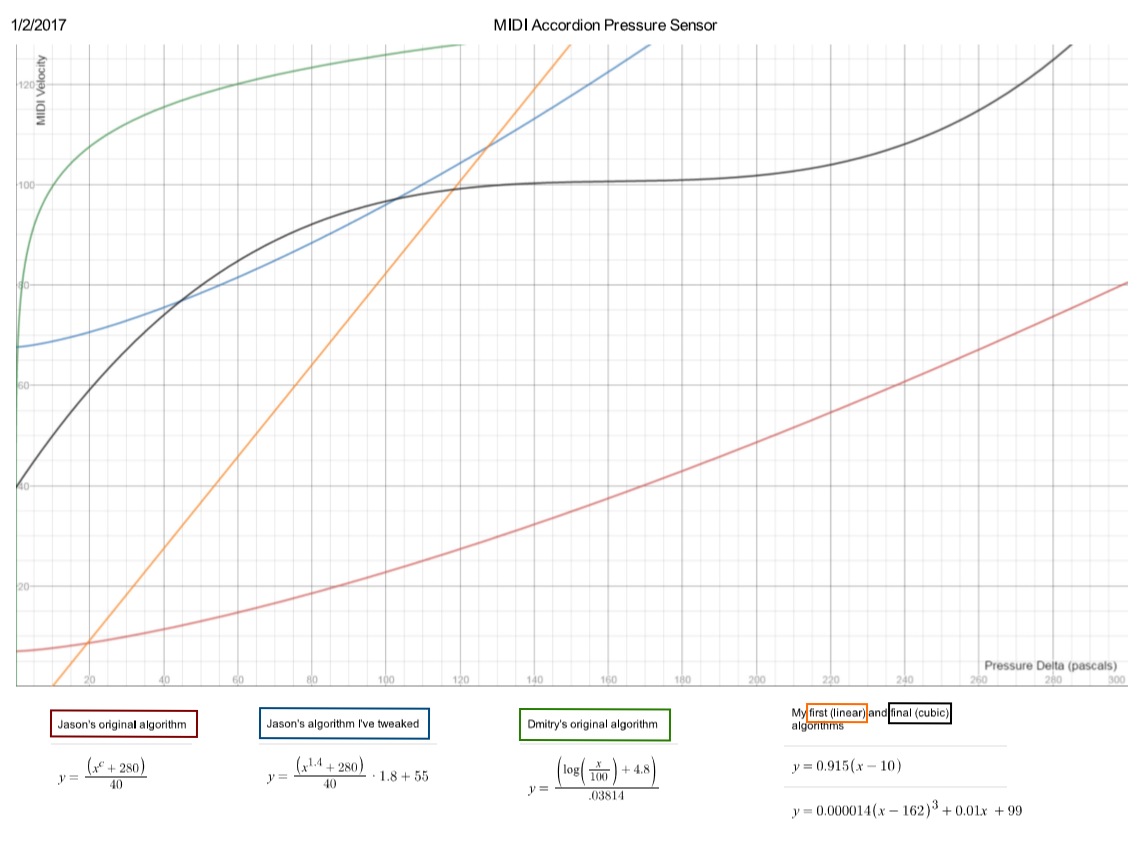
You can view a graph of these functions to better see how they differ (from desmos):
You can also play with these functions yourself.
The X-axis shows how much pressure is being applied, and the Y-axis shows the resulting velocity (0-127). I played around with all 5 functions on my accordion, and they all give wildly different results. Here’s my thought process on testing the various functions and analyzing their differences:
-
I first started with Dmitry’s function (green), which is logarithmic, and whose velocity is capped out at 120 pascals of additional pressure. When I tried this function I could not hear any significant difference in volume when pushing the bellows - this was because I barely had to push them and I was already hitting >120 pascals. From here I concluded that I needed a function with a much wider range of velocity over pressure.
-
So I tried simplifying the function to be linear (yellow) so that it covers a wider vertical range. This appeared to work out great when I was testing my first tutorial (by just blowing on the sensor), but I immediately realized this did not translate to the accordion bellows - the difference in velocity was now too harsh, with sudden jumps up and down in volume, sounding very unnatural.
- From here I dug up Jason’s exponential function (red), which sounded way too soft on my accordion. I later found out this is because Jason did such a good job on closing all the air gaps in his accordion that he can get a much higher pressure with much less force on the bellows.
- Something to also note is that Jason implemented two variations of this function, each with a different constant in the denominator depending on whether the bellows were going in or out. This implies that the detected pressure deltas going in or out were slightly different. I personally did not notice this difference on my accordion, so I did not implement it.
-
I liked the overall curve of Jason’s function, so I tried altering it to better fit my accordion (blue). In doing so, I upped the starting velocity to be much higher, which meant I had less of a range of velocities to work with. This helped make the overall velocity sound a bit more natural, but I felt I could do a better job of making a function that would be more expressive specifically for my accordion.
- So after a couple hours of testing and tweaking, I landed on a cubic function as my final curve (black). Here are the thoughts that helped me come to this conclusion:
- I tested playing the accordion the way I would play my acoustic accordion and determined the max pressure I was likely to get would be around 260 pascals, so I would make that my max.
- While playing normally the pressure hung out a lot between 100 and 220 pascals - to make this playing sound more natural I made the function almost flat here so that minor changes in pressure while playing did not result in sudden, unnatural-sounding jumps in volume.
- I did end up making a minimum velocity of 40, even when the pressure difference was 0 - this removes the ability to stop the sound the way you can with a real accoridion (e.g. bellow shakes), but prevented the sound from unintenionally stopping when you don’t want it to, which was more important to me.
4.3. Plug the leaks some more
So while the pressure expression is now usable, the work described so far is NOT a suitable long-term solution because it is likely still not completely air-tight; you will still find yourself pushing and pulling the bellows a lot further than you would with a real accordion. In order to fully solve this problem, you will need to go the extra mile and close everything up such that the space where the sensor and bellows live have no way to escape the air except for a very small window. I personally still have a lot of work to do on this front to make this work the way I want it to on my accordion.
Troubleshooting
“I can’t figure out how to make a good velocity mapping function for my accordion!”
This is a hard problem to address - I’ve found this to be more of an art than a science when I tried to find a function that worked for me. What definitely helped was having a firm understanding of basic mathematical functions, as well as having an easy, fast way to create, change, and test those functions. Desmos was a tremendous tool in helping me do this - without it I would probably have spent hours trying to draft a not-as-good function on paper, or on my old TI-89 grpahing calculator.
Credit
Thank you to:
- Sparkfun for making a clean, easy to follow BMP180 tutorial
- Jason Bugeja for testing my velocity functions and imploring me to close my air gaps to get a more realistic feel to the bellows.
- Nick Fever for providing a consice list of MIDI CCs for easy reference.